Tensorflow OP 代码分析 [TOC]
增加一个新的op 增加一个新的op需要通过REGISTER_OP 宏进行注册,如下代码所示。宏中定义了这个OP的输入,输出,attr属性等。创建文件tensorflow/core/user_ops/zero_out.cc并输入如下代码
1 2 3 4 5 #include "tensorflow/core/framework/op.h" REGISTER_OP ("ZeroOut" ) .Input ("to_zero: int32" ) .Output ("zeroed: int32" );
ZeroOut这个op名字必须是唯一的,而以下划线_开头的名字一般是保留内部使用的
增加OP的实现 OP仅仅是定义了一个接口,而一个OP可以有很多个实现,包括CPU, GPU等的实现,可以通过继承一个OpKernel 的类,并且重写Compute函数来实现一个tensorflow OP implement. Compute函数接收一个OpKernelContext类型的参数,能够通过它获取相关的op上下文,例如输入,然后对其进行处理。如下是一个例子:
1 2 3 4 5 6 7 8 9 10 11 12 13 14 15 16 17 18 19 20 21 22 23 24 25 26 27 28 29 #include "tensorflow/core/framework/op_kernel.h" using namespace tensorflow;class ZeroOutOp : public OpKernel { public : explicit ZeroOutOp (OpKernelConstruction* context) : OpKernel(context) { void Compute (OpKernelContext* context) override const Tensor& input_tensor = context->input (0 ); auto input = input_tensor.flat <int32>(); Tensor* output_tensor = NULL ; OP_REQUIRES_OK (context, context->allocate_output (0 , input_tensor.shape (), &output_tensor)); auto output = output_tensor->flat <int32>(); const int N = input.size (); for (int i = 1 ; i < N; i++) { output (i) = 0 ; } if (N > 0 ) output (0 ) = input (0 ); } };
注意Compute函数需要保证线程安全的,否则可能会有竞争。
在实现内核之后,将其注册到TensorFlow系统。在注册中,您可以指定运行该内核的不同约束。例如,您可能有一个用于cpu的内核,另一个用于gpu的内核。需要使用如下宏到zero_out.cc文件中:
1 REGISTER_KERNEL_BUILDER (Name ("ZeroOut" ).Device (DEVICE_CPU), ZeroOutOp);
Build OP 库 需要本地安装有g++,然后对zero_out.cc进行编译,找到zero_out.cc文件,对其进行编译
1
2
3
TF_CFLAGS=( $(python -c 'import tensorflow as tf; print(" ".join(tf.sysconfig.get_compile_flags()))') ) TF_LFLAGS=( $(python -c 'import tensorflow as tf; print(" ".join(tf.sysconfig.get_link_flags()))') ) g++ -std=c++11 -shared zero_out.cc -o zero_out.so -fPIC ${TF_CFLAGS[@]} ${TF_LFLAGS[@]} -O2
zero_out.cc全部内容如下:
1 2 3 4 5 6 7 8 9 10 11 12 13 14 15 16 17 18 19 20 21 22 23 24 25 26 27 28 29 30 31 32 33 34 35 36 37 #include "tensorflow/core/framework/op.h" #include "tensorflow/core/framework/op_kernel.h" REGISTER_OP ("ZeroOutzrf" ).Input ("to_zero: int32" ).Output ("zeroed: int32" );using namespace tensorflow;class ZeroOutOpZRF : public OpKernel { public : explicit ZeroOutOpZRF (OpKernelConstruction* context) : OpKernel(context) { void Compute (OpKernelContext* context) override const Tensor& input_tensor = context->input (0 ); auto input = input_tensor.flat <int32>(); Tensor* output_tensor = NULL ; OP_REQUIRES_OK (context, context->allocate_output (0 , input_tensor.shape (), &output_tensor)); auto output = output_tensor->flat <int32>(); const int N = input.size (); for (int i = 1 ; i < N; i++) { output (i) = 0 ; } if (N > 0 ) output (0 ) = input (0 ); } }; REGISTER_KERNEL_BUILDER (Name ("ZeroOutzrf" ).Device (DEVICE_CPU), ZeroOutOpZRF);
使用bazel编译操作 如果你安装了 TensorFlow 源码,则你可以利用 TensorFLow 的构建系统来编译你的操作。把一个 BUILD 文件放在tensorflow/core/user_ops
1
2
3
4
5
6
load ("//tensorflow:tensorflow.bzl" , "tf_custom_op_library" )tf_custom_op_library ( name = "zero_out.so" , srcs = ["zero_out.cc" ], )
运行下列命令来构建 zero_out.so.
1
2
$ bazel build --config opt //tensorflow/core/user_ops:zero_out.so
注意:虽然你可以用标准 cc_library 规则来生成一个共享库文件(.so 文件),我们还是强烈推荐使用 tf_custom_op_library 宏。这个宏加了一些必要的依赖项,而且还包含一些检查,以确保输出的共享库文件与 TensorFlow 的插件加载机制兼容。
条件检查和验证 上述示例假定操作适用于任意形状的张量。但如果我们只处理矢量呢?那么我们就需要在 OpKernel 的实现中加入一个检查:
1
2
3
4
5
6
7
8
void Compute (OpKernelContext* context) override const Tensor& input_tensor = context->input (0 ); OP_REQUIRES (context, TensorShapeUtils::IsVector (input_tensor.shape ()), errors::InvalidArgument ("ZeroOut expects a 1-D vector." )); }
这里我们加了一个断言,它要求输入是一个矢量,否则将设置 InvalidArgument 状态。OP_REQUIRES 宏
另外,如果你想测试从某个函数返回的 Status 对象是否为错误,则使用宏 OP_REQUIRES_OK
属性 操作可以有属性,当一个操作被加到计算图中时,它的属性就会被赋值。这些属性用于配置此操作,它们的值既可以在内核实现中访问,也可以在操作注册时的输入输出类型中进行访问。相较于输入,参数的使用要尽量避免,因为输入更为灵活一些。这是因为属性是常数,
你需要在注册操作时定义属性,定义时要指定名称和使用 Attr 方法的类型,此方法的参数规范如下:
1 <name > : <attr-type-expr >
其中 <name> 以字母开头,由数字、字母和下划线组成,而 <attr-type-expr> 一个类型表达式(参见下方 )。
比如,如果你想让 ZeroOut 操作保留用户指定的索引,而不是仅保留第 0 个元素,你可以按下面的方式来注册操作:
1
2
3
4
REGISTER_OP ("ZeroOut" ) .Attr ("preserve_index: int" ) .Input ("to_zero: int32" ) .Output ("zeroed: int32" );
tf.DType
你实现的内核可以在构造函数中通过 context 参数来访问属性:
1
2
3
4
5
6
7
8
9
10
11
12
13
14
15
16
17
class ZeroOutOp : public OpKernel { public : explicit ZeroOutOp (OpKernelConstruction* context) : OpKernel(context) { OP_REQUIRES_OK (context, context->GetAttr ("preserve_index" , &preserve_index_)); OP_REQUIRES (context, preserve_index_ >= 0 , errors::InvalidArgument ("Need preserve_index >= 0, got " , preserve_index_)); } void Compute (OpKernelContext* context) override } private : int preserve_index_; };
还可以在 Compute 方法中使用这个参数:
1
2
3
4
5
6
7
8
9
10
11
12
13
14
15
void Compute (OpKernelContext* context) override OP_REQUIRES (context, preserve_index_ < input.dimension (0 ), errors::InvalidArgument ("preserve_index out of range" )); const int N = input.size (); for (int i = 0 ; i < N; i++) { output_flat (i) = 0 ; } output_flat (preserve_index_) = input (preserve_index_); }
属性类型 属性支持下列数据类型:
string:任意字节序列(不要求是 UTF8 编码)int:有符号整数float: 浮点数bool: True 或 falsetype: DataTypeshape:一个 TensorShapePrototensor:一个 TensorProtolist(<type>): <type> 的列表,其中 <type> 为其中一种上述类型list(list(<type>)) 是非法的。
欲了解限定性列表,参见 op_def_builder.cc:FinalizeAttr
默认值和约束 属性可以有默认值,有一些属性则还可以有约束。为了定义一个有约束的属性,可以使用下列属性类型表达式(<attr-type-expr>):
{'<string1>', '<string2>'}:表示在 <string1> 或 <string2> 这两种取值中二选一。当你使用这种语法时,系统自动推断出属性类型为 string。这相当于模仿构造了一个枚举:
1
2
REGISTER_OP ("EnumExample" ) .Attr ("e: {'apple', 'orange'}" );
tf.DType
1
2
REGISTER_OP ("RestrictedTypeExample" ) .Attr ("t: {int32, float, bool}" );
常用的类型约束可以有如下别名:
numbertype:type 类型被限制为数值类型(不是字符串,也不是布尔类型)
realnumbertype:类似于 numbertype 类型,但不包括复数类型
quantizedtype:类型于 numbertype 类型,但只包括量化数值类型
属性所支持的类型列表可通过 tensorflow/core/framework/types.hNumberTypes())。在本例中,属性 t 必须是下面一种数值类型:
1
2
REGISTER_OP ("NumberType" ) .Attr ("t: numbertype" );
对于这个操作:
1
2
tf.number_type(t=tf.int32) tf.number_type(t=tf.bool )
列表可以和其他列表及单一类型组合。下面的操作允许属性 t 为任意数值类型或布尔类型:
1
2
REGISTER_OP ("NumberOrBooleanType" ) .Attr ("t: {numbertype, bool}" );
对于这个操作:
1
2
3
tf.number_or_boolean_type(t=tf.int32) tf.number_or_boolean_type(t=tf.bool ) tf.number_or_boolean_type(t=tf.string)
int >= <n>:取值必须是整型,且要求大于等于 <n>,其中 <n> 是一个自然数。
比如,下列操作注册中,指定了属性 a 必须为一个至少为 2 的值:
1
2
REGISTER_OP ("MinIntExample" ) .Attr ("a: int >= 2" );
list(<type>) >= <n>: 取值为<type> 类型的一个列表,其长度大于等于 <n>。
比如,下列操作注册指定属性 a 是一个类型列表(要么是 int32,要么是 float),且要求长度大于等于 3:
1
2
REGISTER_OP ("TypeListExample" ) .Attr ("a: list({int32, float}) >= 3" );
为设置一个属性的默认值(让它在生成代码中成为可选项),可以在最后加上 = <default>,如下面代码所示:
1
2
REGISTER_OP ("AttrDefaultExample" ) .Attr ("i: int = 0" );
这种默认值的支持语法正是计算图的 GraphDef 定义的协议缓存表达中所用的语法。
下面的示例展示如何为所有类型指定默认值:
1
2
3
4
5
6
7
8
9
10
REGISTER_OP ("AttrDefaultExampleForAllTypes" ) .Attr ("s: string = 'foo'" ) .Attr ("i: int = 0" ) .Attr ("f: float = 1.0" ) .Attr ("b: bool = true" ) .Attr ("ty: type = DT_INT32" ) .Attr ("sh: shape = { dim { size: 1 } dim { size: 2 } }" ) .Attr ("te: tensor = { dtype: DT_INT32 int_val: 5 }" ) .Attr ("l_empty: list(int) = []" ) .Attr ("l_int: list(int) = [2, 3, 5, 7]" );
tf.DType
OP源码部分 REGISTER_OP operator(op)是tensorflow扩展功能的的方式。OP分为声明和定义。声明叫op,实现叫kernel.一个声明可以有多个实现。或者说在不同设备上的不同实现。OP需要注册。
时刻注意,OP只是一个声明。如同C++的函数声明。并不涉及这些OP如何实现。比如可以声明一个OP叫Add,其功能是可以做两个数的加法int Add(int a, int b); 而这个声明用一个proto message表示就是message OpDef。而图就是多个OP的输入输出首尾相接组成的有向无环图,这个图实际上表示了函数的调用关系。
OP注册中心接口 只提供了根据名字查找OP的接口。tensorflow/core/framework/op.h
1
2
3
4
5
6
7
8
9
10
11
12
13
14
15
16
17
18
19
20
21
22
23
24
25
26
27
28
29
30
31
32
33
34
35
36
37
class OpRegistryInterface { public : virtual ~OpRegistryInterface (); virtual Status LookUp (const std::string& op_type_name, const OpRegistrationData** op_reg_data) const 0 ; Status LookUpOpDef (const std::string& op_type_name, const OpDef** op_def) const }; class OpRegistry : public OpRegistryInterface { public : typedef std::function<Status(OpRegistrationData*)> OpRegistrationDataFactory; OpRegistry (); ~OpRegistry () override ; void Register (const OpRegistrationDataFactory& op_data_factory) Status LookUp (const std::string& op_type_name, const OpRegistrationData** op_reg_data) const override mutable mutex mu_; mutable std::vector<OpRegistrationDataFactory> deferred_ TF_GUARDED_BY (mu_) mutable std::unordered_map<string, const OpRegistrationData*> registry_ TF_GUARDED_BY (mu_) ; mutable bool initialized_ TF_GUARDED_BY (mu_) mutable Watcher watcher_ TF_GUARDED_BY (mu_) std::function<Status(const OpRegistryInterface&)> op_registry_validator_; };
看这几个接口很简单,但是其参数OpDef, OpRegistrationData很复杂。
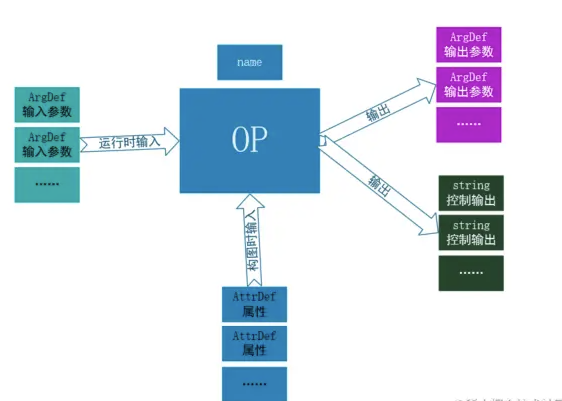
OpDef 一个op有多个输入参数,和多个输入属性,还有多个输出参数,多个控制输出。它们都是Tensor。
输入属性的值在构图时已经确定不变了。而输入参数是执行图时变化数据。
class OpDef 是定义在proto中的。tensorflow/core/framework/op_def.proto
这个proto就声明了个OP.实际上就是把输入输出参数,OP名字等等元信息保存下来。
1
2
3
4
5
6
7
8
9
10
11
12
13
14
15
16
17
18
19
20
21
22
23
24
25
26
27
28
29
30
31
32
33
34
35
36
37
38
39
40
41
42
43
message OpDef { string name = 1 ; message ArgDef { string name = 1 ; string description = 2 ; DataType type = 3 ; string type_attr = 4 ; string number_attr = 5 ; string type_list_attr = 6 ; repeated ResourceHandleProto.DtypeAndShape handle_data = 7 ; bool is_ref = 16 ; FullTypeDef experimental_full_type = 17 ; } repeated ArgDef input_arg = 2 ; repeated ArgDef output_arg = 3 ; repeated string control_output = 20 ; message AttrDef { string name = 1 ; string type = 2 ; AttrValue default_value = 3 ; string description = 4 ; bool has_minimum = 5 ; int64 minimum = 6 ; AttrValue allowed_values = 7 ; } repeated AttrDef attr = 4 ; } message OpDeprecation { int32 version = 1 ; string explanation = 2 ; } message OpList { repeated OpDef op = 1 ; }
OpDefBuilder来生成OP Builder可以通过特定语法格式的字符串来添加 输入参数,输出参数等。添加完成后调用Finalize(OpRegistrationData* op_reg_data)生成了OpRegistrationData. OpRegistrationData有OpDef
tensorflow/core/framework/op_def_builder.h
1 2 3 4 5 6 7 8 9 10 11 12 13 14 15 16 17 class OpDefBuilder { public : explicit OpDefBuilder (std::string op_name) OpDefBuilder& Attr (std::string spec) ; OpDefBuilder& Input (std::string spec) ; OpDefBuilder& Output (std::string spec) ; OpRegistrationData op_reg_data_; std::vector<string> attrs_; std::vector<string> inputs_; std::vector<string> outputs_; std::vector<string> control_outputs_; };
Op注册原理
1
2
3
4
5
6
7
REGISTER_OP ("ZeroOut" ) .Input ("to_zero: int32" ) .Output ("zeroed: int32" ) .SetShapeFn ([](::tensorflow::shape_inference::InferenceContext* c) { c->set_output (0 , c->input (0 )); return Status::OK (); });
REGISTER_OP宏,实际上定义了如下的OpDefBuilderWrapper的对象。
后续调用的.Input, .Output,等都是对此对象中的Input, Output的方法的调用。而Input里实现上转而调用了OpDefBuilder的Input。
1
2
3
4
5
6
7
8
9
10
11
12
13
14
15
16
17
18
19
20
21
22
23
24
25
26
27
28
29
30
31
32
33
34
35
36
37
38
39
40
41
42
43
44
45
46
47
48
namespace register_op {class OpDefBuilderWrapper { public : explicit OpDefBuilderWrapper (const char name[]) : builder_(name) { OpDefBuilderWrapper& Attr (std::string spec) { builder_.Attr (std::move (spec)); return *this ; } OpDefBuilderWrapper& Input (std::string spec) { builder_.Input (std::move (spec)); return *this ; } OpDefBuilderWrapper& Output (std::string spec) { builder_.Output (std::move (spec)); return *this ; } InitOnStartupMarker operator () () ; private : mutable ::tensorflow::OpDefBuilder builder_; }; } #define REGISTER_OP_IMPL(ctr, name, is_system_op) \ static ::tensorflow::InitOnStartupMarker const register_op##ctr \ TF_ATTRIBUTE_UNUSED = \ TF_INIT_ON_STARTUP_IF(is_system_op || SHOULD_REGISTER_OP(name)) \ << ::tensorflow::register_op::OpDefBuilderWrapper(name) #define REGISTER_OP(name) \ TF_ATTRIBUTE_ANNOTATE("tf:op" ) \ TF_NEW_ID_FOR_INIT(REGISTER_OP_IMPL, name, false) #define REGISTER_SYSTEM_OP(name) \ TF_ATTRIBUTE_ANNOTATE("tf:op" ) \ TF_ATTRIBUTE_ANNOTATE("tf:op:system" ) \ TF_NEW_ID_FOR_INIT(REGISTER_OP_IMPL, name, true) }
REGISTER_OP这个宏调用TF_NEW_ID_FOR_INIT. 会使用__COUNTER__宏生成唯一ID.
调用REGISTER_OP_IMPLE时,参数ctr就是counter。
REGISTER_OP_IMPLE所有定义了一个static变量。变量类型是 tensorlfow::InitOnStartUpMarker。变量名是register_op##ctr,实际上就是register_op0, register_op1, ….
TF_INIT_ON_STARTUP_IF宏如果参数是false,则什么也不做,否则 调用后边的<< OpeDefBuilder。这个宏根相当于:!cond ? InitOnStartupMarker{} : (InitOnStartupMarker{} << f); f就是::tensorflow::register_op::OpDefBuilderWrapper(name)。因为InitOnStartUpmarker重载了operator<<。
在下图代码InitOpStartupMarker里调用了OpDefBuilderWrapper的Operator()方法。
1
2
3
4
5
6
7
8
9
10
11
12
13
14
15
16
17
struct InitOnStartupMarker { constexpr InitOnStartupMarker operator <<(InitOnStartupMarker) const { return *this ; } template <typename T> constexpr InitOnStartupMarker operator <<(T&& v) const { return std::forward<T>(v)(); #相当于调用OpDefBuilderWrapper对像的operator () } }; #define TF_INIT_ON_STARTUP_IF(cond) \ (::std::integral_constant<bool, !(cond)> ::value) \ ? ::tensorflow::InitOnStartupMarker{} \ : ::tensorflow::InitOnStartupMarker {}
真正注册在这里:通过builder获取全局注册中心,实际上是不台OP的构建器function保存下来,在需要的时候就可以通过它来new出新的OP对象了。
1 2 3 4 5 6 7 8 9 10 11 12 13 14 15 16 17 18 19 20 21 22 23 24 25 arduino复制代码InitOnStartupMarker OpDefBuilderWrapper::operator () () { OpRegistry::Global ()->Register ( [builder = std::move (builder_)](OpRegistrationData* op_reg_data) -> Status { return builder.Finalize (op_reg_data); }); return {}; } OpRegistry* OpRegistry::Global () { static OpRegistry* global_op_registry = new OpRegistry; return global_op_registry; } void OpRegistry::Register (const OpRegistrationDataFactory& op_data_factory) mutex_lock lock (mu_) ; if (initialized_) { TF_QCHECK_OK (RegisterAlreadyLocked (op_data_factory)); } else { deferred_.push_back (op_data_factory); } } typedef std::function<Status(OpRegistrationData*)> OpRegistrationDataFactory;
最终把构建好的op,其实就是OpRegistrationData插入到map<op_name, OpRegistrationData*> OpRegistry::registry_中。
KERNEL源码部分 tensorflow图结点叫OP(operator)。OP是C++写的可以由使用者任意扩展的。扩展OP分两步,1是OP的声明,也就OP注册,使用REGISTER_OP来完成。2是OP的实现,叫op_kernel。KERNEL也需要注册,叫REGISTER_KERNEL_BUILDER。OP在实现时需要继承OpKernel类。
构图时只需要OP声明即可。运行时才需要查找并实例化Kernel。一个OP在不同的设备上可以有不同的实现。下面的例子是官网最简单的ZeroOut OP声明和Kernel的实现。实际上,声明和实现完全可以独立在不同的文件。本文则着重分析Kernel
Kernel是真正实现计算功能的。
1 2 3 4 5 6 7 8 9 10 11 12 13 14 15 16 17 18 19 20 21 22 23 24 25 26 27 28 29 30 31 32 33 34 35 36 37 38 39 40 41 42 #include "tensorflow/core/framework/op.h" #include "tensorflow/core/framework/shape_inference.h" #include "tensorflow/core/framework/op_kernel.h" using namespace tensorflow;REGISTER_OP ("ZeroOut" ) .Input ("to_zero: int32" ) .Output ("zeroed: int32" ) .SetShapeFn ([](::tensorflow::shape_inference::InferenceContext* c) { c->set_output (0 , c->input (0 )); return Status::OK (); }); class ZeroOutOp : public OpKernel { public : explicit ZeroOutOp (OpKernelConstruction* context) : OpKernel(context) { void Compute (OpKernelContext* context) override const Tensor& input_tensor = context->input (0 ); auto input = input_tensor.flat <int32>(); Tensor* output_tensor = NULL ; OP_REQUIRES_OK (context, context->allocate_output (0 , input_tensor.shape (), &output_tensor)); auto output_flat = output_tensor->flat <int32>(); const int N = input.size (); for (int i = 1 ; i < N; i++) { output_flat (i) = 0 ; } if (N > 0 ) output_flat (0 ) = input (0 ); } }; REGISTER_KERNEL_BUILDER (Name ("ZeroOut" ).Device (DEVICE_CPU), ZeroOutOp);
Kernel tensorflow/core/framework/op_kernel.h
同步计算 Compute方法
kernel计算可以是同步也可以是异步。Compute必须是线程安全。大多数是同步。
同步 kernel 绝不能用锁,条件变量等阻塞当前线程,试图在其他kernel里解锁。有
因为executor可能只有固定数量的线程,都阻塞就会死锁
如果真想加锁,如RecvOp, DequeueOp,必须继承OpKernel的子类AsyncOpKernel。
大多数情况下,AsyncOpKerenl应当使用cancellation机制:context->cancellation_manager()
op的输入输出都要通过参数OpKernelContext context来获得。返回状态也通过ctx->SetStatus()
同步计算中,context可以保证函数返回前直存在。
1 2 3 4 5 6 7 8 9 10 11 12 13 14 15 16 17 18 19 20 21 22 23 24 25 class OpKernel { public : explicit OpKernel (OpKernelConstruction* context) OpKernel (OpKernelConstruction* context, bool is_deferred); OpKernel (OpKernelConstruction* context, NodeDef&& custom_def, bool is_deferred); virtual ~OpKernel (); virtual void Compute (OpKernelContext* context) 0 ; virtual AsyncOpKernel* AsAsync () return nullptr ; } virtual bool IsExpensive () return expensive_; } virtual const Tensor* const_tensor () const return nullptr ; } const NodeDef& def () const return props_->node_def; } const std::string& name () const return props_->node_def.name (); } };
异步计算:AsyncOpKernel 异步也就是computeAsync要立即返回。当然tensorflow会一直保持context存在,直到done被调用。一但done被调用,不应当再使用context。否则会core。
1
2
3
4
5
6
7
8
9
10
11
12
13
14
15
class AsyncOpKernel : public OpKernel { public : using OpKernel::OpKernel; typedef std::function<void ()> DoneCallback; virtual void ComputeAsync (OpKernelContext* context, DoneCallback done) 0 ; AsyncOpKernel* AsAsync () override { return this ; } void Compute (OpKernelContext* context) override };
Kernel构造时的OpKernelConstruction 传入了
设备:device
分配器Allocator
资源管理器:ResourceMgr
Node
Env
FunctionLib
1 2 3 4 5 6 7 8 9 10 11 12 13 14 15 16 17 18 19 20 21 22 23 24 25 26 27 class OpKernelConstruction { public : Env* env () const { return device_->env (); } void SetStatus (const Status& status) const Status& status () const return *status_; } template <class T > Status GetAttr (StringPiece attr_name, T* value) const ; const DeviceType& device_type () const return device_type_; } FunctionLibraryRuntime* function_library () const { return flib_; } ResourceMgr* resource_manager () const { return resource_mgr_; } int graph_def_version () const return graph_def_version_; } DeviceBase* device () const { return device_; } };
OP输入输出参数帮助类 有的输入是个List,用一个名字,代表了同类型的多个输入。 可以认为是Tensor tensors[N].输出也有这种情况。
OpInputList
OpMutableInputList
OpOutputList
Compute的参数OpKernelContext 这个类十分巨大,内容丰富。这个Context提供了Op Compute时所需要的一切。从逻辑上讲,可分为以下几类
输入输出参数获取 Input, Output. 至于Attr,是在构图时获得,OpKernelConstruction里就能获取
输出还涉及到Tensor内存分配
执行环境 env, device, resource_mgr, node, graph, session, step_id, function_library, allocator, session
1
2
3
4
5
6
7
8
9
10
11
12
13
14
15
16
17
18
19
20
21
22
23
24
25
26
27
28
29
30
31
32
33
34
35
36
37
38
39
40
41
42
43
44
45
46
47
48
49
50
51
52
53
54
55
class OpKernelContext { public : const SessionMetadata* session_metadata = nullptr ; TensorStore* tensor_store = nullptr ; explicit OpKernelContext (Params* params) OpKernelContext (Params* params, int num_outputs); ~OpKernelContext (); Env* env () const { return params_->device->env (); } int64_t step_id () const return params_->step_id; } int64_t start_time_usecs () const return params_->start_time_usecs; } const Tensor& input (int index) const Status input (StringPiece name, const Tensor** tensor) ; Status input_list (StringPiece name, OpInputList* list) ; Status input_ref_mutex (StringPiece name, mutex** out_mutex) ; Tensor mutable_input (int index, bool lock_held) ; Status mutable_input (StringPiece name, Tensor* tensor, bool lock_held) ; Status mutable_input_list (StringPiece name, OpMutableInputList* list) ; void replace_ref_input (int index, const Tensor& tensor, bool lock_held) Status replace_ref_input (StringPiece name, const Tensor& tensor, bool lock_held) void delete_ref_input (int input_index, bool lock_held) bool has_input (int index) const Status output_list (StringPiece name, OpOutputList* list) ; Status allocate_output (int index, const TensorShape& shape, Tensor** tensor) TF_MUST_USE_RESULT Status allocate_output (StringPiece name, const TensorShape& shape, Status allocate_output(int index, const TensorShape& shape, Tensor** tensor, AllocatorAttributes attr) TF_MUST_USE_RESULT; Status allocate_output(StringPiece name, const TensorShape& shape, Tensor** tensor, AllocatorAttributes attr) TF_MUST_USE_RESULT; Status allocate_temp(DataType type, const TensorShape& shape, Tensor* out_temp, AllocatorAttributes allocator_attr, const AllocationAttributes& allocation_attr); Status allocate_temp(DataType type, const TensorShape& shape, Tensor* out_temp, AllocatorAttributes allocator_attr) { return allocate_temp(type, shape, out_temp, allocator_attr, AllocationAttributes()); } Status allocate_temp(DataType type, const TensorShape& shape, Tensor* out_temp) { return allocate_temp(type, shape, out_temp, AllocatorAttributes()); } };
kernel实例化 运行时调用如下方法创建Kernel
1
2
3
4
5
6
7
8
9
10
11
12
13
14
15
16
17
18
19
20
21
22
std::unique_ptr<OpKernel> CreateOpKernel (DeviceType device_type, DeviceBase* device, Allocator* allocator, const NodeDef& node_def, int graph_def_version, Status* status) std::unique_ptr<OpKernel> CreateOpKernel ( DeviceType device_type, DeviceBase* device, Allocator* allocator, const std::shared_ptr<const NodeProperties>& props, int graph_def_version, Status* status) Status CreateOpKernel (DeviceType device_type, DeviceBase* device, Allocator* allocator, FunctionLibraryRuntime* flib, const std::shared_ptr<const NodeProperties>& props, int graph_def_version, OpKernel** kernel) Status CreateOpKernel (DeviceType device_type, DeviceBase* device, Allocator* allocator, FunctionLibraryRuntime* flib, ResourceMgr* resource_mgr, const std::shared_ptr<const NodeProperties>& props, int graph_def_version, OpKernel** kernel)
Kernel注册同样使用了宏,工厂等
REGISTER_KERNEL_BUILDER流程分析 1 2 3 4 5 6 7 8 9 10 11 12 13 14 15 16 17 18 19 20 21 22 23 24 25 26 #define REGISTER_KERNEL_BUILDER_IMPL_3(ctr, op_name, kernel_builder_expr, \ is_system_kernel, ...) \ static ::tensorflow::InitOnStartupMarker const register_kernel_##ctr \ TF_ATTRIBUTE_UNUSED = \ TF_INIT_ON_STARTUP_IF(is_system_kernel || \ (SHOULD_REGISTER_OP_KERNEL(#__VA_ARGS__) && \ SHOULD_REGISTER_OP(op_name))) \ << ([](::tensorflow::KernelDef const* kernel_def) { \ 也就是到这里了,使用kernel_factory来注册了一个lambda函数 \ ::tensorflow::kernel_factory::OpKernelRegistrar registrar( \ kernel_def, #__VA_ARGS__, \ [](::tensorflow::OpKernelConstruction* context) \ -> ::tensorflow::OpKernel* { \ return new __VA_ARGS__(context); 这里就是在new ZeroOut \ }); \ (void)registrar; \ return ::tensorflow::InitOnStartupMarker{}; \ })(kernel_builder_expr.Build());
REGISTER_KERNEL_BUILDER(Name(“ZeroOut”).Device(DEVICE_CPU), ZeroOutOp);这个定义中,Name实际上是KernelDefBuilder. Device就是KernelDefBuilder::Device.
REGISTER_KERNEL_BUILDER( KernelDefBuilder对象, ZeroOut这个类)。
OpkernelRegistrar的构建函数里最终调用到这个GlobalKernelRegistry的Reigster
1
2
3
4
5
6
7
8
9
10
11
12
13
14
15
void * GlobalKernelRegistry () static KernelRegistry* global_kernel_registry = []() { KernelRegistry* registry = new KernelRegistry; OpRegistry::Global ()->RegisterValidator (ValidateKernelRegistrations); return registry; }(); return global_kernel_registry; } struct KernelRegistry { mutex mu; std::unordered_multimap<string, KernelRegistration> registry TF_GUARDED_BY (mu); };
从动态库加载kernel tensorflow/core/framework/op_kernel.cc
加载目录:tensorflow/core/kernels目录中的所有so。实际上使用了Env->LoadDynamicLibrary 这种方式是我们扩展tensorflow kernel的方式。直接自己打包成独立的动态库,由tf加载即可。无须与tf源码编译到一起。
1
2
3
4
5
6
7
8
9
10
11
void LoadDynamicKernelsInternal () Env* env = Env::Default (); env->LoadDynamicLibrary (fullpath.c_str (), &unused_filehandle)); } void LoadDynamicKernels () static absl::once_flag dll_loader_flag; absl::call_once (dll_loader_flag, LoadDynamicKernelsInternal); }
Kernel从context中获取输入,分配输出时返回错误 tensorflow/core/framework/op_requires.h中定义了大量的宏,帮助我们实现这些功能。这些宏能根据需要返回错误。这宏非常实用,避免我们写大量的if判断,return返回之类的代码
1 2 3 4 5 6 7 8 9 #define OP_REQUIRES_OK(CTX, ...) \ do { \ ::tensorflow::Status _s(__VA_ARGS__); \ if (!TF_PREDICT_TRUE(_s.ok())) { \ CheckNotInComputeAsync((CTX), "OP_REQUIRES_OK_ASYNC" ); \ (CTX)->CtxFailureWithWarning(__FILE__, __LINE__, _s); \ return; \ } \ } while (0)