中断

中断

​ 说到中断离不开处理器架构,在x86架构下同步的称为异常,异步的称为中断,其区别为:

  • 中断:中断分为可屏蔽中断和不可屏蔽中断,其可以发生在指令执行的任何时间,其中可屏蔽中断是由外部设备发出的中断,不可屏蔽中断通过NMI引脚接入CPU。
  • 异常:指的是CPU执行指令的同时发现执行该指令出错,可以分为处理器检测异常和编程异常,其中处理器检测异常包括故障,陷阱,终止;编程异常包括程序调用int等指令时发出的异常(这种异常有时候也被成为软中断,命名问题,本文称其为异常)

misc

本文基于Linux-5.15。主要涉及中断处理,异常处理,系统调用三个方面的函数调用以及Linux处理逻辑,防止混淆。硬件上的内容就不说了,都耳熟能详了。

arch/x86/include/asm/irq_vectors.h中列了一些宏,用以表示IDT表的一些布局情况,其中可以知道

  • Vectors 0 … 31 : system traps and exceptions - hardcoded events
  • Vectors 32 … 127 : device interrupts
  • Vector 128 : legacy int80 syscall interface
  • Vectors 129 … LOCAL_TIMER_VECTOR-1
  • Vectors LOCAL_TIMER_VECTOR … 255 : special interrupts

其中0 ~ 31号为CPU保留的异常,32 ~ 127号为外部设备中断,128号为系统调用。

异常处理

先从异常处理开始吧,因为异常是在表中是0~31号向量。

在文件arch/x86/include/asm/trapnr.h中保存了异常向量的定义:

1
2
3
4
5
6
7
8
9
10
11
12
13
14
15
16
17
18
19
20
21
22
23
24
#define X86_TRAP_DE		 0	/* Divide-by-zero */
#define X86_TRAP_DB 1 /* Debug */
#define X86_TRAP_NMI 2 /* Non-maskable Interrupt */
#define X86_TRAP_BP 3 /* Breakpoint */
#define X86_TRAP_OF 4 /* Overflow */
#define X86_TRAP_BR 5 /* Bound Range Exceeded */
#define X86_TRAP_UD 6 /* Invalid Opcode */
#define X86_TRAP_NM 7 /* Device Not Available */
#define X86_TRAP_DF 8 /* Double Fault */
#define X86_TRAP_OLD_MF 9 /* Coprocessor Segment Overrun */
#define X86_TRAP_TS 10 /* Invalid TSS */
#define X86_TRAP_NP 11 /* Segment Not Present */
#define X86_TRAP_SS 12 /* Stack Segment Fault */
#define X86_TRAP_GP 13 /* General Protection Fault */
#define X86_TRAP_PF 14 /* Page Fault */
#define X86_TRAP_SPURIOUS 15 /* Spurious Interrupt */
#define X86_TRAP_MF 16 /* x87 Floating-Point Exception */
#define X86_TRAP_AC 17 /* Alignment Check */
#define X86_TRAP_MC 18 /* Machine Check */
#define X86_TRAP_XF 19 /* SIMD Floating-Point Exception */
#define X86_TRAP_VE 20 /* Virtualization Exception */
#define X86_TRAP_CP 21 /* Control Protection Exception */
#define X86_TRAP_VC 29 /* VMM Communication Exception */
#define X86_TRAP_IRET 32 /* IRET Exception */

异常向量初始化

首先启动内核时候,需要初始化异常向量表。

1
2
3
4
start_kernel()  //init/main.c
->trap_init() //arch/x86/kernel/traps.c
->idt_setup_traps() //arch/x86/kernel/idt.c
->idt_setup_from_table(idt_table, def_idts, ARRAY_SIZE(def_idts), true);

上面最后调用在函数idt_setup_from_table中,我们看看这个函数的几个参数定义。在arch/x86/kernel/idt.c中定义了idt表和描述符。

1
2
3
4
5
6
7
8
9
10
11
12
13
14
15
16
17
18
19
20
21
22
23
24
25
26
27
28
29
30
31
32
33
34
35
36
37
38
39
40
41
42
43
44
45
46
static gate_desc idt_table[IDT_ENTRIES] __page_aligned_bss;

static struct desc_ptr idt_descr __ro_after_init = {
.size = IDT_TABLE_SIZE - 1,
.address = (unsigned long) idt_table,
};

static const __initconst struct idt_data def_idts[] = {
INTG(X86_TRAP_DE, asm_exc_divide_error),
ISTG(X86_TRAP_NMI, asm_exc_nmi, IST_INDEX_NMI),
INTG(X86_TRAP_BR, asm_exc_bounds),
INTG(X86_TRAP_UD, asm_exc_invalid_op),
INTG(X86_TRAP_NM, asm_exc_device_not_available),
INTG(X86_TRAP_OLD_MF, asm_exc_coproc_segment_overrun),
INTG(X86_TRAP_TS, asm_exc_invalid_tss),
INTG(X86_TRAP_NP, asm_exc_segment_not_present),
INTG(X86_TRAP_SS, asm_exc_stack_segment),
INTG(X86_TRAP_GP, asm_exc_general_protection),
INTG(X86_TRAP_SPURIOUS, asm_exc_spurious_interrupt_bug),
INTG(X86_TRAP_MF, asm_exc_coprocessor_error),
INTG(X86_TRAP_AC, asm_exc_alignment_check),
INTG(X86_TRAP_XF, asm_exc_simd_coprocessor_error),

#ifdef CONFIG_X86_32
TSKG(X86_TRAP_DF, GDT_ENTRY_DOUBLEFAULT_TSS),
#else
ISTG(X86_TRAP_DF, asm_exc_double_fault, IST_INDEX_DF),
#endif
ISTG(X86_TRAP_DB, asm_exc_debug, IST_INDEX_DB),

#ifdef CONFIG_X86_MCE
ISTG(X86_TRAP_MC, asm_exc_machine_check, IST_INDEX_MCE),
#endif

#ifdef CONFIG_AMD_MEM_ENCRYPT
ISTG(X86_TRAP_VC, asm_exc_vmm_communication, IST_INDEX_VC),
#endif

SYSG(X86_TRAP_OF, asm_exc_overflow),
#if defined(CONFIG_IA32_EMULATION)
SYSG(IA32_SYSCALL_VECTOR, entry_INT80_compat),
#elif defined(CONFIG_X86_32)
SYSG(IA32_SYSCALL_VECTOR, entry_INT80_32),
#endif
};

idt_setup_from_table函数本质就是将def_idts内容赋给idt_table

我们一个个分析,在分析def_idts之前首先得看几个宏,如下所示。

1
2
3
4
5
6
7
8
9
10
11
12
13
14
15
16
17
#define G(_vector, _addr, _ist, _type, _dpl, _segment)	\
{ \
.vector = _vector, \
.bits.ist = _ist, \
.bits.type = _type, \
.bits.dpl = _dpl, \
.bits.p = 1, \
.addr = _addr, \
.segment = _segment, \
}

/* Interrupt gate */
#define INTG(_vector, _addr) \
G(_vector, _addr, DEFAULT_STACK, GATE_INTERRUPT, DPL0, __KERNEL_CS)
/* System interrupt gate */
#define SYSG(_vector, _addr) \
G(_vector, _addr, DEFAULT_STACK, GATE_INTERRUPT, DPL3, __KERNEL_CS)

于是便可知道其内容为x86架构下中断门描述符,其格式如下,其实IDT(INTERRUPT DESCRIPTOR TABLE)表中的表项,该表由IDTR寄存器指向,其格式如下图所示。

image-20220426205810991

image-20220426171754324

最后再来看手册里一张图,这张图大有门道,首先可以看到Linux中用__KERNEL_CS作为其段描述符,也就是图中的GDT表中的索引,而我们知道Linux使用的是平坦内存模型,所以段基址为0,也就导致offset就是异常处理函数的地址。

image-20220426173926048

​ 上述过程将IDT表设置好之后,在后面会通过调用load_idt(&idt_descr);将描述符写入IDTR寄存器,至此就完成了IDT的初始化。

异常向量处理函数

前面我们说到把IDT的内容填充完,使得CPU硬件能够找到异常向量处理函数的入口地址,接下来我们来看这些函数内部是如何处理的。

在文件arch/x86/kernel/traps.c中有类似如下的定义,可以看到这些定义大部分最后都会调用的do_error_trap来进行处理。也有一部分是自己实现的函数,自己调用。只不过这部分的C代码定义有点难看懂,知道异常处理后面到这来了就行。(老的kernel版本是通过汇编中定义的DO_ERROR函数来作为统一的入口,新的kernel现在改了,下一节我们会讲。这也是因此网上和很多书上都讲解的是DO_ERROR和do_sym那一套)。实际上下面的代码显示的code并不是在IDT表中填充的地址,硬件上虽然设计了可以让进程在触发异常时跳转到异常处理函数的硬件逻辑,但是Linux不是那么做的,Linux将所有IDT表项中call的异常处理函数地址是一个统一的入口,该入口会在下一节讲解。

1
2
3
4
5
6
7
8
9
10
11
12
13
14
15
16
17
18
19
20
21
22
23
24
#define DEFINE_IDTENTRY(func)						\
static __always_inline void __##func(struct pt_regs *regs); \

DEFINE_IDTENTRY(exc_divide_error)
{
do_error_trap(regs, 0, "divide error", X86_TRAP_DE, SIGFPE,
FPE_INTDIV, error_get_trap_addr(regs));
}

DEFINE_IDTENTRY(exc_overflow)
{
do_error_trap(regs, 0, "overflow", X86_TRAP_OF, SIGSEGV, 0, NULL);
}
DEFINE_IDTENTRY_ERRORCODE(exc_invalid_tss)
{
do_error_trap(regs, error_code, "invalid TSS", X86_TRAP_TS, SIGSEGV,
0, NULL);
}

DEFINE_IDTENTRY_ERRORCODE(exc_segment_not_present)
{
do_error_trap(regs, error_code, "segment not present", X86_TRAP_NP,
SIGBUS, 0, NULL);
}

OK,总之异常处理我们现在知道最后走到了do_error_trap,我们看看这个函数里面是什么东西,同样是traps.c文件。

1
2
3
4
5
6
7
8
9
10
11
12
13
14
15
16
17
18
19
20
21
22
23
24
25
26
27
28
29
30
static void do_error_trap(struct pt_regs *regs, long error_code, char *str,
unsigned long trapnr, int signr, int sicode, void __user *addr)
{
RCU_LOCKDEP_WARN(!rcu_is_watching(), "entry code didn't wake RCU");

if (notify_die(DIE_TRAP, str, regs, error_code, trapnr, signr) !=
NOTIFY_STOP) {
cond_local_irq_enable(regs);
do_trap(trapnr, signr, str, regs, error_code, sicode, addr);
cond_local_irq_disable(regs);
}
}

static void
do_trap(int trapnr, int signr, char *str, struct pt_regs *regs,
long error_code, int sicode, void __user *addr)
{
struct task_struct *tsk = current;

if (!do_trap_no_signal(tsk, trapnr, str, regs, error_code))
return;

show_signal(tsk, signr, "trap ", str, regs, error_code);

if (!sicode)
force_sig(signr);
else
force_sig_fault(signr, sicode, addr);
}
NOKPROBE_SYMBOL(do_trap);

可以看到,很多处理过程最后都走到了do_trap函数里,且该函数里通过发送一些信号给进程来进行处理异常,而进程收到信号之后会执行信号处理函数。

真正的从用户态陷入内核态执行的代码

​ 很多细心的人应该发现,调用异常处理函数的时候会有一个参数pt_regs, 也就是说明这个函数其实不是真正填到中断向量表里跳转的函数,而是后面分发的函数,那么问题就来了,pt_regs参数是什么,是在什么时候构造的?接下来我们就来讲解真正的从用户态陷入内核态执行的代码逻辑。前方包含大量复杂的汇编和宏,很晦涩难懂。

​ 首先Linux-kernel在arch/x86/entry/entry.S中定义了所有内核的入口函数,其中idtentry(idt entry,这样就明白了)函数就是真正写在IDT表中的地址,其代码如下:

1
2
3
4
5
6
7
8
9
10
11
12
13
14
15
16
17
18
19
20
21
22
23
24
25
26
27
28
29
30
31
32
33
34
35
36
37
38
39
/**
* idtentry - Macro to generate entry stubs for simple IDT entries
* @vector: Vector number
* @asmsym: ASM symbol for the entry point
* @cfunc: C function to be called
* @has_error_code: Hardware pushed error code on stack
*
* The macro emits code to set up the kernel context for straight forward
* and simple IDT entries. No IST stack, no paranoid entry checks.
*/
.macro idtentry vector asmsym cfunc has_error_code:req
SYM_CODE_START(\asmsym)
UNWIND_HINT_IRET_REGS offset=\has_error_code*8
ASM_CLAC

.if \has_error_code == 0
pushq $-1 /* ORIG_RAX: no syscall to restart */
.endif

.if \vector == X86_TRAP_BP
/*
* If coming from kernel space, create a 6-word gap to allow the
* int3 handler to emulate a call instruction.
*/
testb $3, CS-ORIG_RAX(%rsp)
jnz .Lfrom_usermode_no_gap_\@
.rept 6
pushq 5*8(%rsp)
.endr
UNWIND_HINT_IRET_REGS offset=8
.Lfrom_usermode_no_gap_\@:
.endif

idtentry_body \cfunc \has_error_code

_ASM_NOKPROBE(\asmsym)
SYM_CODE_END(\asmsym)
.endm

稍微分析一下,idtentry是一个生成IDT entries的宏,其会生成一个函数,该函数接收一个vecter参数,一个asmsym参数,一个cfunc参数,一个has_error_code参数,其参数说明都在注释里。

但是在执行这个函数之前,也就是在CPU自动跳转到异常处理函数的同时,cpu硬件上会做一些事情,首先他会到TSS中(tr寄存器指向的一个硬件上下文表在GDT中的索引,该表在CPU设计的本意是用于硬件上下文的保存,但是Linux并不那么做,Linux用软件进行保存,而在其中存了kernel stack的地址,tss结构在linux中定义如下)找到kernel stack,其中sp0字段存储了内核栈的地址(64位和32位的定义有所不同,不过这是架构相关内容,得看手册,太细的东西就没必要知道那么清楚了)。

1
2
3
4
5
6
7
8
9
10
11
12
13
14
15
16
17
18
19
20
struct x86_hw_tss {
u32 reserved1;
u64 sp0;
u64 sp1;

/*
* Since Linux does not use ring 2, the 'sp2' slot is unused by
* hardware. entry_SYSCALL_64 uses it as scratch space to stash
* the user RSP value.
*/
u64 sp2;

u64 reserved2;
u64 ist[7];
u32 reserved3;
u32 reserved4;
u16 reserved5;
u16 io_bitmap_base;

} __attribute__((packed));

切换到内核栈之后,CPU还会自动将寄存器压栈,压栈顺序如下图(error code由软件压),左边是32位,右边是64位,最先入栈是SS,然后是RSP,因为内核栈是从上往下增长的。其中的error code字段有些异常处理会有,有些没有,所以在idtentry()宏中13~18行会进行判断是否有error code,如果有会开辟error code的空间并压栈。

image-20220426212350991

接着函数就运行idtentry_body \cfunc \has_error_code到了idtentry_body函数处,该函数定义如下:

1
2
3
4
5
6
7
8
9
10
11
12
13
14
15
16
17
18
19
20
21
/**
* idtentry_body - Macro to emit code calling the C function
* @cfunc: C function to be called
* @has_error_code: Hardware pushed error code on stack
*/
.macro idtentry_body cfunc has_error_code:req

call error_entry
UNWIND_HINT_REGS

movq %rsp, %rdi /* pt_regs pointer into 1st argument*/

.if \has_error_code == 1
movq ORIG_RAX(%rsp), %rsi /* get error code into 2nd argument*/
movq $-1, ORIG_RAX(%rsp) /* no syscall to restart */
.endif

call \cfunc

jmp error_return
.endm

该函数在error_entry函数中构造pt_reg结构体,即把用户态的旧寄存器压栈,然后将栈顶指针(rsp指向pt_reg结构体,该结构体是栈上空间构造的)传递给rdi,我们都知道rdi是x64函数调用的第一个参数,也就终于回到了前面所提的参数是pt_regs的问题了,所以这里call \cfunc才是前面DEFINE_IDTENTRY定义的真正函数,而该参数也是从idtentry中一直传递下来的,相当于:

1
2
3
4
IDT表指向
->idtentry(vector, asmsym, cfunc, has_error_code)
->idtentry_body(cfun, has_error_code)
->cfunc(pt_regs)

终于清楚了所有的逻辑,我们最后看看error_entry中怎么做的把。

1
2
3
4
5
6
7
8
9
10
11
12
13
14
15
16
17
18
19
20
21
22
23
24
25
26
27
28
29
30
31
32
33
34
35
36
37
38
39
40
41
42
43
44
45
46
47
48
49
50
51
52
53
54
55
56
57
58
59
60
61
62
63
64
65
66
67
68
69
70
71
72
73
74
75
76
77
78
79
80
81
82
83
/*
* Save all registers in pt_regs, and switch GS if needed.
*/
SYM_CODE_START_LOCAL(error_entry)
UNWIND_HINT_FUNC
cld
PUSH_AND_CLEAR_REGS save_ret=1
ENCODE_FRAME_POINTER 8
testb $3, CS+8(%rsp)
jz .Lerror_kernelspace

/*
* We entered from user mode or we're pretending to have entered
* from user mode due to an IRET fault.
*/
SWAPGS
FENCE_SWAPGS_USER_ENTRY
/* We have user CR3. Change to kernel CR3. */
SWITCH_TO_KERNEL_CR3 scratch_reg=%rax

.Lerror_entry_from_usermode_after_swapgs:
/* Put us onto the real thread stack. */
popq %r12 /* save return addr in %12 */
movq %rsp, %rdi /* arg0 = pt_regs pointer */
call sync_regs
movq %rax, %rsp /* switch stack */
ENCODE_FRAME_POINTER
pushq %r12
ret

.Lerror_entry_done_lfence:
FENCE_SWAPGS_KERNEL_ENTRY
.Lerror_entry_done:
ret

/*
* There are two places in the kernel that can potentially fault with
* usergs. Handle them here. B stepping K8s sometimes report a
* truncated RIP for IRET exceptions returning to compat mode. Check
* for these here too.
*/
.Lerror_kernelspace:
leaq native_irq_return_iret(%rip), %rcx
cmpq %rcx, RIP+8(%rsp)
je .Lerror_bad_iret
movl %ecx, %eax /* zero extend */
cmpq %rax, RIP+8(%rsp)
je .Lbstep_iret
cmpq $.Lgs_change, RIP+8(%rsp)
jne .Lerror_entry_done_lfence

/*
* hack: .Lgs_change can fail with user gsbase. If this happens, fix up
* gsbase and proceed. We'll fix up the exception and land in
* .Lgs_change's error handler with kernel gsbase.
*/
SWAPGS
FENCE_SWAPGS_USER_ENTRY
jmp .Lerror_entry_done

.Lbstep_iret:
/* Fix truncated RIP */
movq %rcx, RIP+8(%rsp)
/* fall through */

.Lerror_bad_iret:
/*
* We came from an IRET to user mode, so we have user
* gsbase and CR3. Switch to kernel gsbase and CR3:
*/
SWAPGS
FENCE_SWAPGS_USER_ENTRY
SWITCH_TO_KERNEL_CR3 scratch_reg=%rax

/*
* Pretend that the exception came from user mode: set up pt_regs
* as if we faulted immediately after IRET.
*/
mov %rsp, %rdi
call fixup_bad_iret
mov %rax, %rsp
jmp .Lerror_entry_from_usermode_after_swapgs
SYM_CODE_END(error_entry)

其通过调用PUSH_AND_CLEAR_REGS构造pt_regs结构体,将相应的通用寄存器入栈。

1
2
3
4
5
6
7
8
9
10
11
12
13
14
15
16
17
18
19
20
21
22
23
24
25
26
27
28
29
30
31
32
33
.macro PUSH_AND_CLEAR_REGS rdx=%rdx rax=%rax save_ret=0
PUSH_REGS rdx=\rdx, rax=\rax, save_ret=\save_ret
CLEAR_REGS
.endm

.macro PUSH_REGS rdx=%rdx rax=%rax save_ret=0
.if \save_ret
pushq %rsi /* pt_regs->si */
movq 8(%rsp), %rsi /* temporarily store the return address in %rsi */
movq %rdi, 8(%rsp) /* pt_regs->di (overwriting original return address) */
.else
pushq %rdi /* pt_regs->di */
pushq %rsi /* pt_regs->si */
.endif
pushq \rdx /* pt_regs->dx */
pushq %rcx /* pt_regs->cx */
pushq \rax /* pt_regs->ax */
pushq %r8 /* pt_regs->r8 */
pushq %r9 /* pt_regs->r9 */
pushq %r10 /* pt_regs->r10 */
pushq %r11 /* pt_regs->r11 */
pushq %rbx /* pt_regs->rbx */
pushq %rbp /* pt_regs->rbp */
pushq %r12 /* pt_regs->r12 */
pushq %r13 /* pt_regs->r13 */
pushq %r14 /* pt_regs->r14 */
pushq %r15 /* pt_regs->r15 */
UNWIND_HINT_REGS

.if \save_ret
pushq %rsi /* return address on top of stack */
.endif
.endm

接着后面就不细讲了,其中16行有一个SWAPGS指令,其会交换kernel的CR3和user的CR3,CR3是页表基址,很多人会问地址空间kernel和user不是一起的吗,其实这里是由于KPTI的缘故,因为熔断meltdown和幽灵specter的硬件缺陷导致的漏洞,内核采用了KPTI,将用户页表和内核页表隔离来防止用户通过侧信道攻击获取内核数据,这里便是KPTI的体现,具体自己去查资料。

最后贴一个pt_regs结构体定义,省的读者去找,看了之后是不是突然就明了了栈上的寄存器存储的顺序(64位的)。

1
2
3
4
5
6
7
8
9
10
11
12
13
14
15
16
17
18
19
20
21
22
23
24
25
26
27
28
29
30
31
32
33
34
struct pt_regs {
/*
* C ABI says these regs are callee-preserved. They aren't saved on kernel entry
* unless syscall needs a complete, fully filled "struct pt_regs".
*/
unsigned long r15;
unsigned long r14;
unsigned long r13;
unsigned long r12;
unsigned long bp;
unsigned long bx;
/* These regs are callee-clobbered. Always saved on kernel entry. */
unsigned long r11;
unsigned long r10;
unsigned long r9;
unsigned long r8;
unsigned long ax;
unsigned long cx;
unsigned long dx;
unsigned long si;
unsigned long di;
/*
* On syscall entry, this is syscall#. On CPU exception, this is error code.
* On hw interrupt, it's IRQ number:
*/
unsigned long orig_ax;
/* Return frame for iretq */
unsigned long ip;
unsigned long cs;
unsigned long flags;
unsigned long sp;
unsigned long ss;
/* top of stack page */
};

有始有终

执行完了异常处理函数,总得返回用户态把,再来看看返回时候的逻辑。在idtentry_body函数中最后会jmp error_return返回,其会判断保存的cs是kernel的还是user的,如果是user则返回user,如果是kernel返回kernel。毕竟执行kernel代码也可能出现异常。

1
2
3
4
5
6
7
SYM_CODE_START_LOCAL(error_return)
UNWIND_HINT_REGS
DEBUG_ENTRY_ASSERT_IRQS_OFF
testb $3, CS(%rsp)
jz restore_regs_and_return_to_kernel
jmp swapgs_restore_regs_and_return_to_usermode
SYM_CODE_END(error_return)

然后截取几段比较重要的,和弹出寄存器相关的代码,其中POP_REGS弹出相关寄存器,然后通过iretq指令会弹出最后的SS:RSP,得到存储的用户/内核栈进行返回。这里嵌套了很多跳转的地方,总而言之最后都会到iretq的指令,中间细节就不细讲了。

1
2
3
4
5
6
7
8
9
10
11
12
13
14
15
16
17
18
19
20
21
22
23
24
25
26
27
SYM_CODE_START_LOCAL(common_interrupt_return)
SYM_INNER_LABEL(swapgs_restore_regs_and_return_to_usermode, SYM_L_GLOBAL)
POP_REGS pop_rdi=0
addq $8, %rsp /* skip regs->orig_ax */

......

popq %rdi
SWAPGS
INTERRUPT_RETURN /*#define INTERRUPT_RETURN jmp native_iret*/
SYM_INNER_LABEL(restore_regs_and_return_to_kernel, SYM_L_GLOBAL)
POP_REGS
addq $8, %rsp /* skip regs->orig_ax */
/*
* ARCH_HAS_MEMBARRIER_SYNC_CORE rely on IRET core serialization
* when returning from IPI handler.
*/
INTERRUPT_RETURN /*#define INTERRUPT_RETURN jmp native_iret*/
SYM_INNER_LABEL_ALIGN(native_iret, SYM_L_GLOBAL)
UNWIND_HINT_IRET_REGS

......

SYM_INNER_LABEL(native_irq_return_iret, SYM_L_GLOBAL)
iretq
SYM_CODE_END(common_interrupt_return)
_ASM_NOKPROBE(common_interrupt_return)

中断处理

讲完了异常再来讲中断。还是一样的过程,先是初始化,然后是发生中断时候的逻辑,最后是退出中断的逻辑。

中断向量初始化

中断向量初始化的函数调用逻辑如下

1
2
3
4
5
6
7
8
9
10
start_kernel()
->init_IRQ()
->native_init_IRQ()
->idt_setup_apic_and_irq_gates()
->idt_setup_from_table(idt_table, apic_idts, ARRAY_SIZE(apic_idts), true);
for_each_clear_bit_from(i, system_vectors, FIRST_SYSTEM_VECTOR) {
entry = irq_entries_start + 8 * (i - FIRST_EXTERNAL_VECTOR);
set_intr_gate(i, entry);
}
->load_idt(&idt_descr);

又是熟悉的操作呗,idt_setup_from_table函数把apic_idts的内容拷贝到idt_table,上面讲过idt_table是什么,这里我们就看看apic_idts定义,哈哈明了了,又是一样的东西:

1
2
3
4
5
6
7
8
9
10
11
12
13
14
15
16
17
18
19
20
21
22
23
24
25
26
27
28
29
30
31
32
33
34
35
36
static const __initconst struct idt_data apic_idts[] = {
#ifdef CONFIG_SMP
INTG(RESCHEDULE_VECTOR, asm_sysvec_reschedule_ipi),
INTG(CALL_FUNCTION_VECTOR, asm_sysvec_call_function),
INTG(CALL_FUNCTION_SINGLE_VECTOR, asm_sysvec_call_function_single),
INTG(IRQ_MOVE_CLEANUP_VECTOR, asm_sysvec_irq_move_cleanup),
INTG(REBOOT_VECTOR, asm_sysvec_reboot),
#endif

#ifdef CONFIG_X86_THERMAL_VECTOR
INTG(THERMAL_APIC_VECTOR, asm_sysvec_thermal),
#endif

#ifdef CONFIG_X86_MCE_THRESHOLD
INTG(THRESHOLD_APIC_VECTOR, asm_sysvec_threshold),
#endif

#ifdef CONFIG_X86_MCE_AMD
INTG(DEFERRED_ERROR_VECTOR, asm_sysvec_deferred_error),
#endif

#ifdef CONFIG_X86_LOCAL_APIC
INTG(LOCAL_TIMER_VECTOR, asm_sysvec_apic_timer_interrupt),
INTG(X86_PLATFORM_IPI_VECTOR, asm_sysvec_x86_platform_ipi),
# ifdef CONFIG_HAVE_KVM
INTG(POSTED_INTR_VECTOR, asm_sysvec_kvm_posted_intr_ipi),
INTG(POSTED_INTR_WAKEUP_VECTOR, asm_sysvec_kvm_posted_intr_wakeup_ipi),
INTG(POSTED_INTR_NESTED_VECTOR, asm_sysvec_kvm_posted_intr_nested_ipi),
# endif
# ifdef CONFIG_IRQ_WORK
INTG(IRQ_WORK_VECTOR, asm_sysvec_irq_work),
# endif
INTG(SPURIOUS_APIC_VECTOR, asm_sysvec_spurious_apic_interrupt),
INTG(ERROR_APIC_VECTOR, asm_sysvec_error_interrupt),
#endif
};

中断处理函数

​ 还是同样的,瞅瞅中断处理函数的定义吧,这里截取了一小部分,熟悉的DECLARE_IDTENTRY宏:

1
2
3
4
5
6
7
8
9
10
11
12
13
14
15
16
/* System vector entry points */
#ifdef CONFIG_X86_LOCAL_APIC
DECLARE_IDTENTRY_SYSVEC(ERROR_APIC_VECTOR, sysvec_error_interrupt);
DECLARE_IDTENTRY_SYSVEC(SPURIOUS_APIC_VECTOR, sysvec_spurious_apic_interrupt);
DECLARE_IDTENTRY_SYSVEC(LOCAL_TIMER_VECTOR, sysvec_apic_timer_interrupt);
DECLARE_IDTENTRY_SYSVEC(X86_PLATFORM_IPI_VECTOR, sysvec_x86_platform_ipi);
#endif

#ifdef CONFIG_SMP
DECLARE_IDTENTRY(RESCHEDULE_VECTOR, sysvec_reschedule_ipi);
DECLARE_IDTENTRY_SYSVEC(IRQ_MOVE_CLEANUP_VECTOR, sysvec_irq_move_cleanup);
DECLARE_IDTENTRY_SYSVEC(REBOOT_VECTOR, sysvec_reboot);
DECLARE_IDTENTRY_SYSVEC(CALL_FUNCTION_SINGLE_VECTOR, sysvec_call_function_single);
DECLARE_IDTENTRY_SYSVEC(CALL_FUNCTION_VECTOR, sysvec_call_function);
#endif
......

​ 当然函数内容也截取一小部分,就是真正处理中断的地方。

1
2
3
4
5
6
7
8
9
10
11
12
13
14
15
16
17
18
19
20
21
DEFINE_IDTENTRY_SYSVEC_SIMPLE(sysvec_reschedule_ipi)
{
ack_APIC_irq();
trace_reschedule_entry(RESCHEDULE_VECTOR);
inc_irq_stat(irq_resched_count);
scheduler_ipi();
trace_reschedule_exit(RESCHEDULE_VECTOR);
}

DEFINE_IDTENTRY_SYSVEC(sysvec_apic_timer_interrupt)
{
struct pt_regs *old_regs = set_irq_regs(regs);

ack_APIC_irq();
trace_local_timer_entry(LOCAL_TIMER_VECTOR);
local_apic_timer_interrupt();
trace_local_timer_exit(LOCAL_TIMER_VECTOR);

set_irq_regs(old_regs);
}
......

当然上面列出的是有中断处理函数定义的地方,但是不是所有的32~127号中断向量都被定义了的,肯定会有一些空缺,空缺的地方怎么填呢,回忆一下中断向量初始化的函数调用逻辑,可以看到在函数idt_setup_apic_and_irq_gates有那么一部分代码,如下所示,其将IDT中空缺的位置用irq_entries_start加上了一个偏移填充,也就是跳转到了irq_entries_start数组中某个index的地方。

1
2
3
4
for_each_clear_bit_from(i, system_vectors, FIRST_SYSTEM_VECTOR) {
entry = irq_entries_start + 8 * (i - FIRST_EXTERNAL_VECTOR);
set_intr_gate(i, entry);
}

OK我们来看看irq_entries_start里面是什么:

1
2
3
4
5
6
7
8
9
10
11
12
13
14
	.align 8
SYM_CODE_START(irq_entries_start)
vector=FIRST_EXTERNAL_VECTOR
.rept NR_EXTERNAL_VECTORS
UNWIND_HINT_IRET_REGS
0 :
.byte 0x6a, vector
jmp asm_common_interrupt
nop
/* Ensure that the above is 8 bytes max */
. = 0b + 8
vector = vector+1
.endr
SYM_CODE_END(irq_entries_start)

看不懂没关系,其实这个数组中填充了8字节的汇编指令,每8字节都是如下的形式。

1
2
3
0x6a(push) xxx 
0xe9(jmp) asm_common_interrupt
0x90(nop)

也就是往栈上push了一个向量号,然后跳转到asm_common_interrupt处。

真正陷入内核态执行的地方

上回书我们说到asm_common_interrupt的地方,这边是中断处理的真正函数入口点。其定义如下,也用到了DECLARE_IDTENTRY_IRQ。

1
2
//定义
DECLARE_IDTENTRY_IRQ(X86_TRAP_OTHER, common_interrupt);

那就跟之前一样了,跟异常那块串起来了,也是跳到idtentry的汇编代码处,然后,硬件把一些寄存器压栈,软件上会构造pt_regs,等等,都是异常处理部分讲过的内容,最后会调用common_interrupt函数。我们来看看common_interrupt做了什么

1
2
3
4
5
6
7
8
9
10
11
12
13
14
15
16
17
18
19
20
21
22
23
24
25
DEFINE_IDTENTRY_IRQ(common_interrupt)
{
struct pt_regs *old_regs = set_irq_regs(regs);
struct irq_desc *desc;

/* entry code tells RCU that we're not quiescent. Check it. */
RCU_LOCKDEP_WARN(!rcu_is_watching(), "IRQ failed to wake up RCU");

desc = __this_cpu_read(vector_irq[vector]);
if (likely(!IS_ERR_OR_NULL(desc))) {
handle_irq(desc, regs);
} else {
ack_APIC_irq();

if (desc == VECTOR_UNUSED) {
pr_emerg_ratelimited("%s: %d.%u No irq handler for vector\n",
__func__, smp_processor_id(),
vector);
} else {
__this_cpu_write(vector_irq[vector], VECTOR_UNUSED);
}
}

set_irq_regs(old_regs);
}

OK,总之就是对中断进行一些处理,如果描述表中没有会报No irq handler for vector等等,然后又是中断返回那一套,具体看异常处理中有始有终章节即可。

系统调用

系统调用也经过过时代的变迁,首先早期的系统执行系统调用时候,即通过INT指令调用,INT指令的作用是触发一个中断向量,其参数作为中断向量号,而处理器执行INT 0x80便是系统调用的中断向量号(0x80,128)。但是现在处理器有了新的指令SYSCALL指令,其也是x86_64内核默认使用的方法,64位的defconfig没有下面两个config选项了。所以这里我们将两种方式都进行讲解。

1
2
3
4
5
#if defined(CONFIG_IA32_EMULATION)
SYSG(IA32_SYSCALL_VECTOR, entry_INT80_compat),
#elif defined(CONFIG_X86_32)
SYSG(IA32_SYSCALL_VECTOR, entry_INT80_32),
#endif

int 0x80

首先是老式的办法,通过指令触发中断,执行INT指令,然后触发0x80中断向量进行系统调用处理,如果在64位内核上要强制使用需要打开上述config,随后便和前述逻辑中的处理方式一样,进入entry_INT80_compat的汇编代码入口处,而32位使用的入口是entry_INT80_32,这里我们就看看64位的吧:

1
2
3
4
5
6
7
8
9
10
11
12
13
14
15
16
17
18
19
20
21
22
23
24
25
26
27
28
29
30
31
32
33
34
35
36
37
38
39
40
41
42
43
44
45
46
47
48
49
50
51
52
53
54
55
56
57
58
59
60
61
62
63
64
65
66
67
68
69
70
71
72
73
74
75
SYM_CODE_START(entry_INT80_compat)
UNWIND_HINT_EMPTY
/*
* Interrupts are off on entry.
*/
ASM_CLAC /* Do this early to minimize exposure */
SWAPGS

/*
* User tracing code (ptrace or signal handlers) might assume that
* the saved RAX contains a 32-bit number when we're invoking a 32-bit
* syscall. Just in case the high bits are nonzero, zero-extend
* the syscall number. (This could almost certainly be deleted
* with no ill effects.)
*/
movl %eax, %eax

/* switch to thread stack expects orig_ax and rdi to be pushed */
pushq %rax /* pt_regs->orig_ax */
pushq %rdi /* pt_regs->di */

/* Need to switch before accessing the thread stack. */
SWITCH_TO_KERNEL_CR3 scratch_reg=%rdi

/* In the Xen PV case we already run on the thread stack. */
ALTERNATIVE "", "jmp .Lint80_keep_stack", X86_FEATURE_XENPV

movq %rsp, %rdi
movq PER_CPU_VAR(cpu_current_top_of_stack), %rsp

pushq 6*8(%rdi) /* regs->ss */
pushq 5*8(%rdi) /* regs->rsp */
pushq 4*8(%rdi) /* regs->eflags */
pushq 3*8(%rdi) /* regs->cs */
pushq 2*8(%rdi) /* regs->ip */
pushq 1*8(%rdi) /* regs->orig_ax */
pushq (%rdi) /* pt_regs->di */
.Lint80_keep_stack:

pushq %rsi /* pt_regs->si */
xorl %esi, %esi /* nospec si */
pushq %rdx /* pt_regs->dx */
xorl %edx, %edx /* nospec dx */
pushq %rcx /* pt_regs->cx */
xorl %ecx, %ecx /* nospec cx */
pushq $-ENOSYS /* pt_regs->ax */
pushq %r8 /* pt_regs->r8 */
xorl %r8d, %r8d /* nospec r8 */
pushq %r9 /* pt_regs->r9 */
xorl %r9d, %r9d /* nospec r9 */
pushq %r10 /* pt_regs->r10*/
xorl %r10d, %r10d /* nospec r10 */
pushq %r11 /* pt_regs->r11 */
xorl %r11d, %r11d /* nospec r11 */
pushq %rbx /* pt_regs->rbx */
xorl %ebx, %ebx /* nospec rbx */
pushq %rbp /* pt_regs->rbp */
xorl %ebp, %ebp /* nospec rbp */
pushq %r12 /* pt_regs->r12 */
xorl %r12d, %r12d /* nospec r12 */
pushq %r13 /* pt_regs->r13 */
xorl %r13d, %r13d /* nospec r13 */
pushq %r14 /* pt_regs->r14 */
xorl %r14d, %r14d /* nospec r14 */
pushq %r15 /* pt_regs->r15 */
xorl %r15d, %r15d /* nospec r15 */

UNWIND_HINT_REGS

cld

movq %rsp, %rdi
call do_int80_syscall_32
jmp swapgs_restore_regs_and_return_to_usermode
SYM_CODE_END(entry_INT80_compat)

粗略讲一下:2-29行大概就是一些关中断,然后处理KPTI等等的一些处理过程,随后是进行pt_regs构建压栈,最后调用(call)do_int80_syscall_32函数,其会从pt_regs中读取相应的系统调用号,然后进行相应的处理,就不过多叙述了。最后就是swapgs_restore_regs_and_return_to_usermode,就是处理KPTI,将寄存器弹出,然后返回用户态balabala一大堆。

SYSCALL/SYSENTER指令方式

该指令会从IA32_LSTAR_MSR寄存器中取出系统调用入口到RIP寄存器,然后执行相应的系统调用统一入口函数,其方式比上述方式快。那么Linux内核中怎么做的呢,下面一一道来:

寄存器初始化

arch/x86/kernel/cpu/common.c文件中的syscall_init函数对寄存器进行初始化,其通过wrmsr将entry_SYSCALL_64的系统调用入口写入MSR_LSTAR寄存器(Linux定义的寄存器名字),也就是上面所说的IA32_LSTAR_MSR(Intel定义的寄存器名字)。下面代码也可以看到如果开启了32位等选项,也可以使用SYSCALL指令进行跳转到entry_SYSCALL_compat处,该函数前面一节已经分析了。

1
2
3
4
5
6
7
8
void syscall_init(void)
{
wrmsr(MSR_STAR, 0, (__USER32_CS << 16) | __KERNEL_CS);
wrmsrl(MSR_LSTAR, (unsigned long)entry_SYSCALL_64);

#ifdef CONFIG_IA32_EMULATION
wrmsrl(MSR_CSTAR, (unsigned long)entry_SYSCALL_compat);
.....

调用SYSCALL指令前后

OK我们来看看entry_SYSCALL_64里面做了什么,首先猜一下应该就是硬件寄存器压栈,软件把寄存器压栈,跳转系统调用函数,处理完成返回那一套呗。就把代码都贴上了,粗略看一下果然就是那么做的。

1
2
3
4
5
6
7
8
9
10
11
12
13
14
15
16
17
18
19
20
21
22
23
24
25
26
27
28
29
30
31
32
33
34
35
36
37
38
39
40
41
42
43
44
45
46
47
48
49
50
51
52
53
54
55
56
57
58
59
60
61
62
63
64
65
66
67
68
69
70
71
72
73
74
75
76
77
78
79
80
81
82
83
84
85
86
87
88
89
90
91
92
93
94
95
96
97
98
99
100
101
102
103
104
105
106
107
108
109
110
111
112
113
114
115
116
117
118
119
120
121
122
123
124
125
126
127
128
129
130
131
132
SYM_CODE_START(entry_SYSCALL_64)
UNWIND_HINT_EMPTY

swapgs
/* tss.sp2 is scratch space. */
movq %rsp, PER_CPU_VAR(cpu_tss_rw + TSS_sp2)
SWITCH_TO_KERNEL_CR3 scratch_reg=%rsp
movq PER_CPU_VAR(cpu_current_top_of_stack), %rsp

SYM_INNER_LABEL(entry_SYSCALL_64_safe_stack, SYM_L_GLOBAL)

/* Construct struct pt_regs on stack */
pushq $__USER_DS /* pt_regs->ss */
pushq PER_CPU_VAR(cpu_tss_rw + TSS_sp2) /* pt_regs->sp */
pushq %r11 /* pt_regs->flags */
pushq $__USER_CS /* pt_regs->cs */
pushq %rcx /* pt_regs->ip */
SYM_INNER_LABEL(entry_SYSCALL_64_after_hwframe, SYM_L_GLOBAL)
pushq %rax /* pt_regs->orig_ax */

PUSH_AND_CLEAR_REGS rax=$-ENOSYS

/* IRQs are off. */
movq %rsp, %rdi
/* Sign extend the lower 32bit as syscall numbers are treated as int */
movslq %eax, %rsi
call do_syscall_64 /* returns with IRQs disabled */

/*
* Try to use SYSRET instead of IRET if we're returning to
* a completely clean 64-bit userspace context. If we're not,
* go to the slow exit path.
* In the Xen PV case we must use iret anyway.
*/

ALTERNATIVE "", "jmp swapgs_restore_regs_and_return_to_usermode", \
X86_FEATURE_XENPV

movq RCX(%rsp), %rcx
movq RIP(%rsp), %r11

cmpq %rcx, %r11 /* SYSRET requires RCX == RIP */
jne swapgs_restore_regs_and_return_to_usermode

/*
* On Intel CPUs, SYSRET with non-canonical RCX/RIP will #GP
* in kernel space. This essentially lets the user take over
* the kernel, since userspace controls RSP.
*
* If width of "canonical tail" ever becomes variable, this will need
* to be updated to remain correct on both old and new CPUs.
*
* Change top bits to match most significant bit (47th or 56th bit
* depending on paging mode) in the address.
*/
#ifdef CONFIG_X86_5LEVEL
ALTERNATIVE "shl $(64 - 48), %rcx; sar $(64 - 48), %rcx", \
"shl $(64 - 57), %rcx; sar $(64 - 57), %rcx", X86_FEATURE_LA57
#else
shl $(64 - (__VIRTUAL_MASK_SHIFT+1)), %rcx
sar $(64 - (__VIRTUAL_MASK_SHIFT+1)), %rcx
#endif

/* If this changed %rcx, it was not canonical */
cmpq %rcx, %r11
jne swapgs_restore_regs_and_return_to_usermode

cmpq $__USER_CS, CS(%rsp) /* CS must match SYSRET */
jne swapgs_restore_regs_and_return_to_usermode

movq R11(%rsp), %r11
cmpq %r11, EFLAGS(%rsp) /* R11 == RFLAGS */
jne swapgs_restore_regs_and_return_to_usermode

/*
* SYSCALL clears RF when it saves RFLAGS in R11 and SYSRET cannot
* restore RF properly. If the slowpath sets it for whatever reason, we
* need to restore it correctly.
*
* SYSRET can restore TF, but unlike IRET, restoring TF results in a
* trap from userspace immediately after SYSRET. This would cause an
* infinite loop whenever #DB happens with register state that satisfies
* the opportunistic SYSRET conditions. For example, single-stepping
* this user code:
*
* movq $stuck_here, %rcx
* pushfq
* popq %r11
* stuck_here:
*
* would never get past 'stuck_here'.
*/
testq $(X86_EFLAGS_RF|X86_EFLAGS_TF), %r11
jnz swapgs_restore_regs_and_return_to_usermode

/* nothing to check for RSP */

cmpq $__USER_DS, SS(%rsp) /* SS must match SYSRET */
jne swapgs_restore_regs_and_return_to_usermode

/*
* We win! This label is here just for ease of understanding
* perf profiles. Nothing jumps here.
*/
syscall_return_via_sysret:
/* rcx and r11 are already restored (see code above) */
POP_REGS pop_rdi=0 skip_r11rcx=1

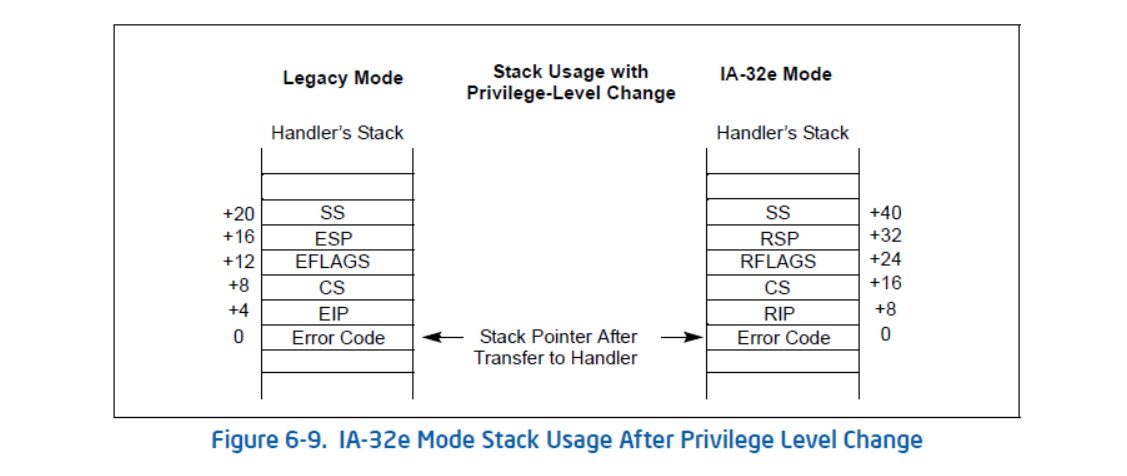
/*
* Now all regs are restored except RSP and RDI.
* Save old stack pointer and switch to trampoline stack.
*/
movq %rsp, %rdi
movq PER_CPU_VAR(cpu_tss_rw + TSS_sp0), %rsp
UNWIND_HINT_EMPTY

pushq RSP-RDI(%rdi) /* RSP */
pushq (%rdi) /* RDI */

/*
* We are on the trampoline stack. All regs except RDI are live.
* We can do future final exit work right here.
*/
STACKLEAK_ERASE_NOCLOBBER

SWITCH_TO_USER_CR3_STACK scratch_reg=%rdi

popq %rdi
popq %rsp
swapgs
sysretq
SYM_CODE_END(entry_SYSCALL_64)

首先2-9行由于SYSCALL指令没有IDT表那一块硬件逻辑,硬件不会自动加载TSS中的内核栈位置给寄存器,所以需要手动用软件的方式进行加载内核栈地址,也是从tss结构体中加载。然后看注释就知道,就构建pt_regs结构体,之后27行call了do_syscall_64,进行真正的系统调用处理,然后最后都会到swapgs_restore_regs_and_return_to_usermode进行返回,大差不差。

do_syscall_64进行系统调用处理

行吧,具体逻辑就不说了,贴个代码看看就行了,大概就是读一下系统调用号,然后跳转到相应的系统调用处理函数进行执行,然后返回就完了。

1
2
3
4
5
6
7
8
9
10
11
12
13
14
15
16
__visible noinstr void do_syscall_64(struct pt_regs *regs, int nr)
{
add_random_kstack_offset(); //ASLR,安全问题,就给栈加了个偏移
nr = syscall_enter_from_user_mode(regs, nr); //一些初始化的处理,检查等操作

instrumentation_begin();//KMSAN相关操作,如果没开选项则为空

//do_syscall_x64处理64位系统调用,里面会调用系统调用表中的函数,x32就是32位的,不过是运行在64位kernel上的32位程序使用的
if (!do_syscall_x64(regs, nr) && !do_syscall_x32(regs, nr) && nr != -1) {
/* Invalid system call, but still a system call. */
regs->ax = __x64_sys_ni_syscall(regs);
}

instrumentation_end();//同前
syscall_exit_to_user_mode(regs);//退出之前的最后处理,什么开关中断啊什么的。
}

Reference

Linux-kernel source code 5.15

Intel spec